Well folks, it has been a while since I last posted… I took a vacation! Vacation as a mom of a little one is a bit of a lie; my job never ends. I guess I don’t even really take vacations- just trips. I still woke up every day by 7am without an alarm and played, fed, changed, and put down the little lady for naps. But in between those times was the fun part!
Since I wasn’t home, I didn’t have any chores to take care of during nap time and I got to visit and create with some of my favorite people. My dear friend is getting married this Summer and had the awesome idea of using paper flowers in her wedding!

This Etsy shop sells paper flower bouquets—genius!
Well, bouquet making went very, very slowly. We made great headway in the decision making department but did not make nearly as many flowers as we originally intended. It would almost seem as though we hadn’t made good use of our time but, we actually worked through a lot of the creative process and that is truly where the bulk of the work lies in art making.
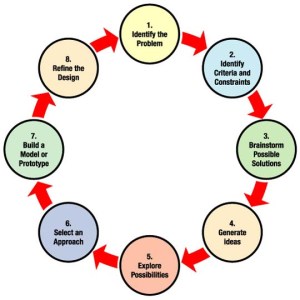
Engineering Design Process from nasa.gov for all you STEAM teachers
I mentioned in a previous post about the similarities of the engineering design process and the art making process.
In art we first identify a need, problem, question, etc. Great artists ask big questions. In the creative process this involves a lot of questioning on the teacher’s part. A great place to sneak in some HOTS questioning.
Next, the artist identifies the criteria and constraints. For example, my friend had to identify what kinds of materials for her flowers she was willing to use and what colors worked in her bouquets. We talked through the idea of a theme: vintage/classic or hip/fun.
Now once we understood theme, materials, and colors we could begin to brainstorm solutions. In the art classroom, this looks different depending on how the students work through their thinking. Some kids sketch, some create by trial and error, others may need to talk with a classmate, or research in a resource center. Regardless of how students brainstorm, its important to have them create several (3-5) different ideas.
From there, the students can select their best idea and work it into the final product.
Part of the art making process that is often left out is the refining. In the NASA model above, this is set alone at the end however, in art, refining is done throughout the process. Students should constantly be looking at their work for ways to improve and to make sure that they are communicating their idea. Here are some great tips for helping kids look at and refine their work:
1. Take a tour. By taking a break, walking around and looking at the work of others the student can get a fresh perspective of their own work. Walking away and coming back helps refocus our minds. Some teachers have the entire class take a “gallery walk.”
2. Praise and Polish (adapt activity on link for art). Have students fold a paper in half and leave it in front of their work. On the top of one side write “Praise” and on the other side write “Polish.” Students then walk around and look at 3 other students work and leave them one positive thing about their work and one thing to improve. (Obviously, you should have taught about constructive criticism prior to this activity).
3. Think, Pair, Share. I love cooperative learning techniques and this is one of my favorites because of its simplicity and adaptability. Ask your class a question. For example: “In what way does your artwork reflect your selected theme?” Give them one minute to think about their answer. After one minute, have them pair with a neighbor and answer the question. (A well trained class will know how to ask one another good questions). Finally, have a few children share their answers with the class.
4. A good old-fashioned art critique. We all have used these before and they are important because they provide the teacher the opportunity to model questioning and information sharing in art.
So, how far did we get in the bouquet making— I think we were at select an approach before I had to head off back to VA. I miss them already and will be here, making paper flowers at nap time.